The Hobonichi Weeks planner is a favorite for its flexible design: a weekly schedule on the left and a blank grid on the right. With the right tools and layout ideas, you can make it work for your life, whether you’re tracking tasks, habits, or creative projects. Here’s how to get started:
Personalize your layout for busy weeks, relaxed schedules, or even seasonal themes. The goal? A planner that keeps you organized and fun to use every day.

The Hobonichi Weeks planner offers a mix of structure and flexibility through its key components:
This planner’s layout is designed for practical and creative use, featuring:
The 3.7mm grid ensures neat layouts, while the thin Tomoe River paper resists ink bleeding and provides a smooth writing experience.
Now that you know the structure, here are some ways to make the most of it. The design works best when paired with thoughtful planning methods.
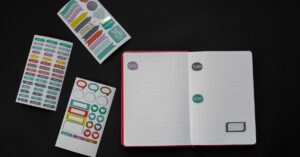
Left Page (Weekly):
Right Page (Grid):
You can enhance organization by using thin washi tape for visual separation and fine-tip pens (0.4mm or smaller) to avoid ink spreading on the delicate paper [1].
Make the most of the Hobonichi Weeks’ paper and layout by using tools that complement its design. Now that you’re familiar with the planner’s structure, let’s dive into the supplies that can help you create functional and visually appealing layouts.
Start with pens that work well with the paper, avoiding smudging or bleed-through. Opt for fine-tip markers (0.4mm or smaller) with quick-drying, water-resistant ink. The Pastel Stabilo 0.4mm is a popular choice for its minimal bleed-through [1]. For highlighting, dual-tip markers are great for keeping your colors consistent.
Washi tape isn’t just decorative – it can be a practical addition to your layouts. Look for tapes with the right width and adhesive strength to suit your needs.
When it comes to stickers, focus on ones that add functionality to your planner:
If you want to add flair to your spreads without overloading them, consider these handy tools:
Choose tools that simplify your planning process while keeping it creative and enjoyable.
Make the most of the Hobonichi Weeks’ layout to create well-organized weekly spreads.
The Hobonichi Weeks’ structure is perfect for dividing and conquering your plans. Here’s how to organize it effectively:
For a quick glance at your day, add a small "focus box" at the top of each date to highlight your main priority.
Keep habit and goal tracking simple yet effective. Here’s a quick guide:
| Tracker Type | Suggested Placement | Space Needed |
|---|---|---|
| Daily Habits | Top of Grid Page | 7 small boxes |
| Weekly Goals | Middle Section | 3-4 lines |
| Progress Bars | Bottom Section | 2-3 lines |
Want to track daily habits? A 7×5 grid works well for managing up to five habits across the week, while still leaving room for other planning elements. Adjust these templates to fit your needs while keeping the layout clean and functional.
Here are a few layout ideas to suit different priorities:
Add pens, stickers, or color coding to separate categories and make your layouts visually appealing.
Make your planner not just functional but visually appealing with these simple design ideas. These tips build on the organizational methods we covered earlier, while adding a personal touch to your layouts.
Stick to 3-4 core colors to organize your planner effectively without making it look cluttered. Here’s a practical way to create a color-coding system:
| Category | Color | Purpose |
|---|---|---|
| Headings | Single Highlighter | Establish visual hierarchy |
| Work Tasks | Primary Color | Easy to identify |
| Personal Tasks | Secondary Color | Clear separation |
| Important Events | Accent Color | Draw attention |
Consistency is key – use the same colors throughout your planner. Opt for lighter shades for highlighting and darker tones for writing to keep everything clear and easy to read.
Bring life to your planner with thoughtful decorations. Thin washi tape works great for dividers, while small stickers can highlight important tasks or events. Follow these tips to keep your designs neat:
For a polished look, designate a specific area in each spread for creative touches, like the bottom margin or corners. This keeps your planner organized while giving you space to personalize it [1][2].
Once you’ve got the basics of layouts down, tweak them to fit your schedule as it shifts. Your Hobonichi Weeks planner can handle both hectic and calm periods while staying consistent.
Change up your layout depending on how packed your week looks:
| Element | Busy Week | Relaxed Week |
|---|---|---|
| Time Blocking | Hour-by-hour slots | Broad sections for morning/afternoon/evening |
| Task Lists | Tight bullet points | Open spaces for notes or reflections |
| Dividers | Simple, minimal lines | Decorative touches or themed borders |
Tie your layouts to the season while sticking to your main color palette for a smooth look. Each season comes with its own focus areas, so you can mix practicality with style:
These tweaks allow you to keep your planner useful and visually appealing, no matter the season or how busy life gets.
Your Hobonichi Weeks planner is more than just a tool for organization; it’s a space where planning meets creativity. By starting with simple layouts and tweaking them over time, you can create a system that truly fits your life.
The key is finding a balance between staying organized and letting your personality shine through. As seen in the weekly layout examples, your approach will naturally shift as your needs and preferences change over time [1].
Here are a few guiding principles to keep in mind:
Use the tips and techniques from earlier to experiment and refine. The best layout is the one that keeps you both organized and excited to use your planner regularly.