The Hobonichi Weeks planner is a compact tool designed to help you stay organized with its unique two-page weekly layout. Here’s why it’s effective:
With options like Standard (240 pages) or Mega (400 pages) sizes, the planner adapts to your space needs. Start simple with schedules and tasks, then gradually personalize with stickers, washi tape, or themes to make planning enjoyable and visually clear. Regular weekly reviews and adjustments ensure it continues to meet your goals.
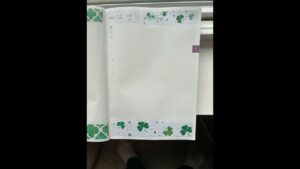
The Hobonichi Weeks Planner offers a simple yet flexible layout that can be customized to fit your needs. It includes a weekly spread made up of two pages designed to work together.
On the left-hand page, you’ll find a vertical calendar divided into three sections for morning, afternoon, and evening plans. It also includes week numbers and moon phase details based on the traditional Japanese calendar .
The right-hand page features graph paper with a 3.55 mm grid and a faint vertical divider called the "Secret Line." This subtle line helps organize your notes and tasks. Here are some common ways to use it:
| Left of Line | Right of Line |
|---|---|
| Important tasks | Detailed notes |
| Project titles | Updates or progress |
| Event times | Follow-up actions |
The planner uses Hobonichi’s 52 gsm Tomoe River paper , which offers several advantages:
| Feature | Why It Matters |
|---|---|
| Thin and lightweight | Keeps the planner compact and easy to carry |
| Smooth texture | Works well with different types of pens |
| Minimal ghosting | Ensures pages remain easy to read |
| Ink-resistant | Handles light watercolor and stickers with ease |
This paper is especially helpful if you like to add creative touches like watercolor or stickers to your planner.
The Hobonichi Weeks comes in two sizes: Standard and Mega. The Standard version has 240 pages, including 71 note pages, making it great for portability. The Mega version, with 400 pages and 231 note pages, is ideal if you need extra space for journaling or detailed notes .
Building on the planner’s structure, these layout ideas can improve how you organize your week while keeping it visually appealing.
The way you organize your weekly layout impacts how effectively you plan. An up-down layout stacks days vertically, giving you more room for detailed daily plans – perfect for time-blocking. On the other hand, a side-to-side layout spreads the week horizontally across the pages, making it easier to spot scheduling conflicts at a glance .
| Layout Style | Ideal For | Space Per Day |
|---|---|---|
| Up-down | Detailed daily schedules | 3-4 lines per day |
| Side-to-side | Weekly overview | Equal columns per day |
Your choice depends on whether you need a detailed breakdown of each day or a quick overview of the entire week.
Divide your weekly spread into sections tailored to specific tasks or goals. The grid system in graph paper planners allows for flexible and creative layouts that help you manage tasks and stay organized.
Incorporate tools like color-coding to separate work, personal, and health tasks. The grid system is great for creating trackers – mood charts or progress bars for goals are easy to set up. For added functionality without clutter, try using minimalist sticker sets like those from Dark Moon Paper.
| Tracking Element | How to Use It | Why It Helps |
|---|---|---|
| Time blocks | Vertical divisions | Manage schedules |
| Habits | Use the grid system | Build consistency |
| Priorities | Apply color-coding | Organize visually |
After setting up effective tracking systems, you can refine your layouts to improve both functionality and appeal. The goal is to strike a balance between organization and decoration.
Themed sticker kits, like those from Dark Moon Paper, are designed to fit Hobonichi’s 3.55mm grid perfectly. These can help define sections and make your planner more engaging. Here’s how to use them effectively:
| Decoration Element | Placement | Purpose |
|---|---|---|
| Header stickers | Top of sections | Clearly label areas |
| Icon stickers | Next to tasks | Easy visual cues |
| Thin washi tape (3-5mm) | Between days | Create subtle boundaries |
| Decorative boxes | Empty spaces | Add style without clutter |
For added functionality, use thin washi tape to separate days and fold the edges to create handy bookmarks. Every decorative element should enhance organization, not just add flair.
Use your writing style and colors to create a clear visual structure:
Stick to 2-3 main colors per spread to avoid overwhelming the layout. For instance, gray can be your default color, blue for work-related tasks, and green for personal items.
Update your layouts each month with subtle seasonal touches. Keep them practical and aligned with your color-coding system. For example:
Limit your themed elements to a thin washi tape border and a few small stickers per spread. This keeps the layout professional while adding a bit of personality.
Once you’ve got your layout system in place, keeping it effective over time is the next step. Here are some practical tips to make sure your planner continues to work for you.
Dedicate a regular time each week for planning, like Sunday evening or Monday morning . Pair this with an activity like reviewing your digital calendar. Here’s a simple framework to follow:
| Time | Activity | Purpose |
|---|---|---|
| 5 minutes | Look back at last week | Move any unfinished tasks |
| 10 minutes | Add appointments | Sync with your digital tools |
| 10 minutes | Set up the week ahead | Plan layout and priorities |
Keep all your planning tools – like your Hobonichi Weeks, pens, and sticky notes – organized in one spot. If you’re struggling to make it a habit, use phone reminders until it becomes second nature.
Sometimes your planner layout might need a tweak. Look out for signs like:
When it’s time to make adjustments:
For lengthy projects, try a "Rolling Tasks" list in the notes section instead of overloading your weekly spreads. Experiment with pencil or erasable pens for flexible section divisions.
To keep your planner in great shape and maintain its look:
A pencil board under the page you’re writing on can help prevent indentations, and letting ink fully dry before closing the planner will avoid smears. With a little care, your planner will stay both functional and visually pleasing throughout the year.
Your Hobonichi Weeks planner can be a game-changer for staying organized when you combine structured layouts with consistent use. Studies suggest that using visual planning methods can increase productivity by up to 25% compared to less organized approaches . The trick lies in balancing structure with flexibility to suit your needs.
Adding personal touches to your planner, like decorative elements, can make a big difference. Research shows that customizing your planner can boost how often you use it by as much as 40% . Striking a balance between functionality and style keeps planning both practical and enjoyable.
Make sure your layout evolves with your priorities. Adjust your weekly spreads to match your current goals while sticking to the core systems that work for you.
Set aside time for weekly reviews to check if your planning approach is still effective. By following these strategies, your Hobonichi can become a reliable tool for managing time, staying productive, and expressing your personal style. It’s all about creating a system that grows with you.